My Western European Diorama Under Construction (2 Viewers)

Looking great! Love all the angles! That is how to do it... Good choice with the G scale track, will keep that in mind, it looks like a good match.
 
Looking great! Love all the angles! That is how to do it... Good choice with the G scale track, will keep that in mind, it looks like a good match.

Thanks mate and yeah, I did a bit of research on the track and found it to be a good match to 1:30 scale. A friend of mine sent me a picture of some Figarti track which was measured by someone and it's almost the same width as my track. Figarti track is known to be 1:30 scale.

Tom
 

Attachments

  • Figarti Track Dimensions.jpg
    Figarti Track Dimensions.jpg
    51.6 KB · Views: 226
  • DSC04403.jpg
    DSC04403.jpg
    254.3 KB · Views: 220
Hey fellas

Just a quick update on my dio. I have glued down the JG Miniature rock wall sections, gate posts and I also glued in little stones I found around the yard to increase the length of the wall at two ends and to fill in gaps. I had to do this as the JGM rock wall was not the perfect length for my fence and I got gaps in the wall as it had to follow the contours of the creek. The JGM corner wall section was also not perfect so I had to fill in gaps to make it look right. As you can see from the pic's, I haven't painted and weathered the stones yet to match the JGM wall sections, but i'll be doing that tomorrow.

I have done a fair bit more on the grassing but I won't post anymore pic's just yet until I have done a little bit more. I will post some more pic's in the next week or so.

Tom
 

Attachments

  • DSC04557.jpg
    DSC04557.jpg
    155.1 KB · Views: 182
  • DSC04558.jpg
    DSC04558.jpg
    250.9 KB · Views: 184
  • DSC04559.jpg
    DSC04559.jpg
    178.5 KB · Views: 185
  • DSC04560.jpg
    DSC04560.jpg
    183 KB · Views: 182
  • DSC04562.jpg
    DSC04562.jpg
    156.3 KB · Views: 182
Last lot of pic's and sorry that the one below and some of the previous one's were a bit blurry.

Tom
 

Attachments

  • DSC04563.jpg
    DSC04563.jpg
    170.1 KB · Views: 185
  • DSC04564.jpg
    DSC04564.jpg
    162 KB · Views: 182
  • DSC04566.jpg
    DSC04566.jpg
    375 KB · Views: 185
Love the 'overhead' shot of the walls surrounding the building.

You do great work.

Thank you.
 
Love those stone walls Tom, gives it a nice European feel if you get my drift.
 
Tom...

really nice work on the JG rock wall sections...

you're very meticulous and it's really paying dividends...

great job!
 
Really looking forward Tom, to see it bustling with vehicles and figures. A real show piece in the making. Robin.
 
Looking good mate nice way to spend you Saturday night ^&grin

Thanks mate and not so much in the night but spent most of yesterday on it!

Love the 'overhead' shot of the walls surrounding the building.

You do great work.

Thank you.

Thanks mate and I forgot to put in the gates but i'll put them in on my next lot of pic's.

Love those stone walls Tom, gives it a nice European feel if you get my drift.

Cheers Toddy.

Tom...

really nice work on the JG rock wall sections...

you're very meticulous and it's really paying dividends...

great job!

Thanks Mike and I'm probably a bit to meticulous at times!

Really looking forward Tom, to see it bustling with vehicles and figures. A real show piece in the making. Robin.

Thanks Robin and I'm itching to do a dio bustling with vehicles and figures! I have so many scenes in mind so I'm devoting a lot of time to finish this diorama.

Thanks to all the likers as well.

Tom
 
With the diorama you are doing ,you are going to have lots of different scenarios to display . Attention to detail is incredible ,cant wait to see the finished result and keep posting pictures ,great work Graham
 
With the diorama you are doing ,you are going to have lots of different scenarios to display . Attention to detail is incredible ,cant wait to see the finished result and keep posting pictures ,great work Graham

Thanks Graham, I'm making good headway and i'll post some more pic's in the next week or so.

Tom
 
Hi all

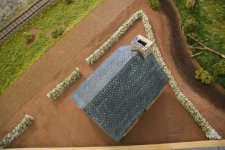
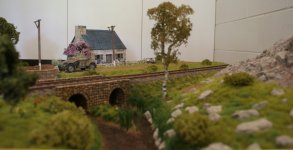
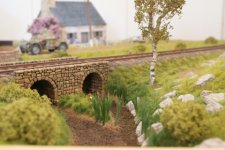
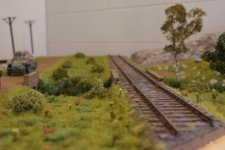
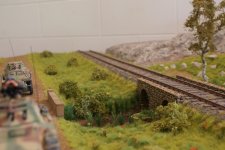
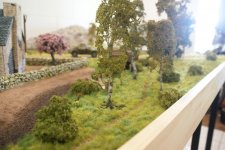
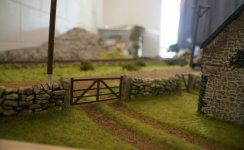
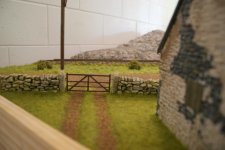
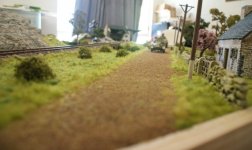
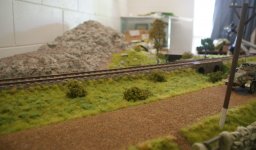
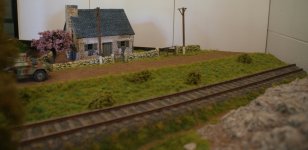
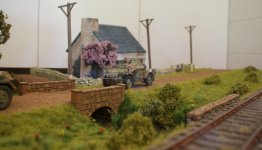
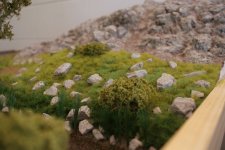
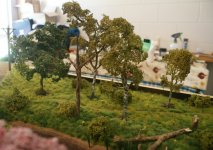
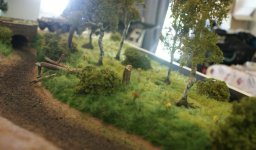
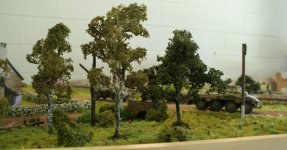
Here's another update on my dio construction. As you can see I am getting close to finishing all the grassing and I am just waiting on some more grass tuffs and bushes to arrive so I can place them along the creek and next to the railway embankment just below the hill. The grass I used by the way is a mixture of Green Line (Fredericus Rex) grass tuffs in different sizes and shades of green, Heki 6mm Wildgrass in Autumn (light green) which comes in a bag, Silflor medium green 6mm grass mats (I cut little bits off the mat) and 2 different shades of Woodlands Scenics green blended turf which also comes in bags. My process of laying the grass is by firstly making sure you have all the grass and tools ready, then I spread some PVA glue around with a smallish modelers brush but I don't do a big area as you need time to lay the grass before the PVA glue dries. If the surface is sloped then I use 100% PVA glue so it doesn’t run so fast. If the surface is flat then I use a mixture of 60% glue and 40% water and I do this as it not only saves on glue, but it makes it easier to spread and the glue is not so thick. I place the tuffs and small sections of Silfor grass first, then I sprinkle with my fingers (and sometimes using tweezers for tight and smallish areas) the Heki grass fibers, spreading it around the tuffs of grass. I do the same with the Woodlands Scenics blended turf which I sprinkle next. I blend all the grasses so you get a natural look such as having a lighter green on the hill and away from the creek and a darker green along the creek edges. I clump all the grass tuffs closer together on the creek edges and use less of the light green Heki grass fibres. I dab it all down gently with another modelers (dry) brush but I make sure I don't flatten the grass so it sticks up and looks to be reasonably long. This is my technique, not sure if it's right but I think it looks ok and I have learned along the way and made improvements on how I lay the grass sections and the mixtures of grass shades and lengths.

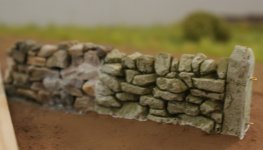
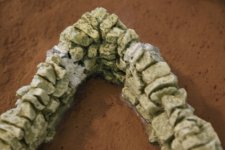
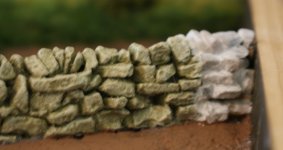
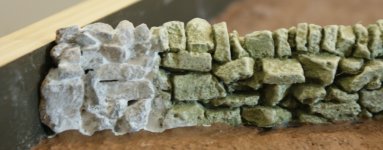
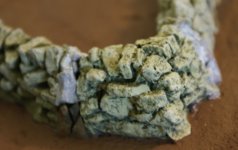
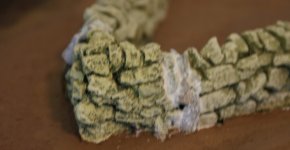
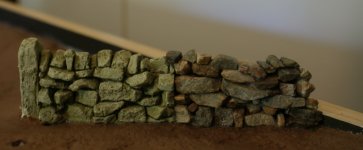
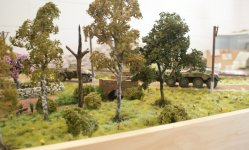
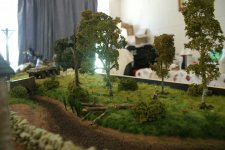
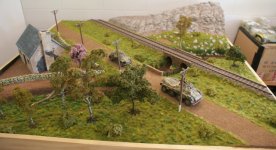
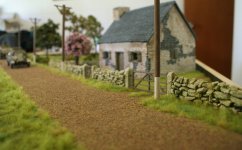
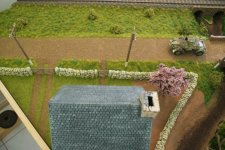
As for the rest of the dio, I have painted and weathered the rock wall sections that I made and I blended them into the existing pre-made, painted and weathered JG Miniature rock wall sections. I made the 2 gates to fit the JG gate posts and I weathered the posts and the entire rock wall so all the sections blend in seamlessly. I have also grassed around the boulders on the hill and I'll start grassing up on the rocky section in the coming weeks.

Not much else to say other than I have added some more reeds along the creek and also glued in some more flowers. I will glue in a heap more flowers and some more reeds over the coming weeks as well.

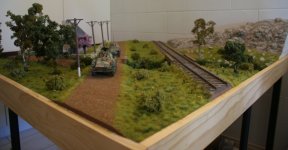
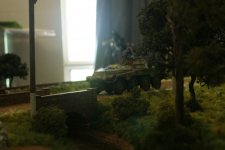
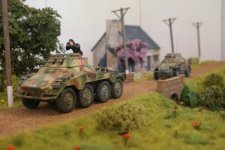
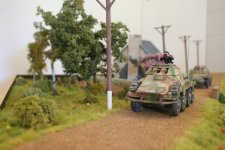
The 2 K&C Armoured Cars are again to show you the scale of the diorama.

This has been an epic construction believe me but I have enjoyed it and it has kept me out of mischief!

Tom
 

Attachments

  • DSC04570.jpg
    DSC04570.jpg
    213.5 KB · Views: 173
  • DSC04571.jpg
    DSC04571.jpg
    190.8 KB · Views: 174
  • DSC04572.jpg
    DSC04572.jpg
    278.8 KB · Views: 170
  • DSC04573.jpg
    DSC04573.jpg
    231.3 KB · Views: 172
  • DSC04574.jpg
    DSC04574.jpg
    265.4 KB · Views: 157
More pic's
 

Attachments

  • DSC04575.jpg
    DSC04575.jpg
    297.2 KB · Views: 169
  • DSC04576.jpg
    DSC04576.jpg
    299.4 KB · Views: 171
  • DSC04577.jpg
    DSC04577.jpg
    308.1 KB · Views: 171
  • DSC04578.jpg
    DSC04578.jpg
    243.2 KB · Views: 173
  • DSC04579.jpg
    DSC04579.jpg
    216.2 KB · Views: 168
Those vehicles are what it is about, it lifts the diorama to a new level. Well done Tom. Looking forward to seeing all sorts of layouts in the future.:salute::, Robin.
 
and more..
 

Attachments

  • DSC04580.jpg
    DSC04580.jpg
    232.2 KB · Views: 185
  • DSC04581.jpg
    DSC04581.jpg
    222.7 KB · Views: 182
  • DSC04582.jpg
    DSC04582.jpg
    238.3 KB · Views: 181
  • DSC04583.jpg
    DSC04583.jpg
    191.4 KB · Views: 179
  • DSC04584.jpg
    DSC04584.jpg
    277.2 KB · Views: 177
Well done mate, best way to do this sort of dio is have a go and if it don't work do it another way until it looks right which is what you have done.....:salute:: The building and rail bridge are particularly well done.....:rolleyes2::wink2:.
 
More..
 

Attachments

  • DSC04586.jpg
    DSC04586.jpg
    261.3 KB · Views: 205
  • DSC04587.jpg
    DSC04587.jpg
    203.9 KB · Views: 202
  • DSC04588.jpg
    DSC04588.jpg
    253.8 KB · Views: 206
  • DSC04589.jpg
    DSC04589.jpg
    262.2 KB · Views: 205
  • DSC04590.jpg
    DSC04590.jpg
    281.6 KB · Views: 201
and some more...
 

Attachments

  • DSC04593.jpg
    DSC04593.jpg
    297.3 KB · Views: 212
  • DSC04594.jpg
    DSC04594.jpg
    220.6 KB · Views: 215
  • DSC04595.jpg
    DSC04595.jpg
    246.7 KB · Views: 217
  • DSC04596.jpg
    DSC04596.jpg
    232.3 KB · Views: 212
  • DSC04597.jpg
    DSC04597.jpg
    420.5 KB · Views: 210

Users who are viewing this thread

Back
Top